Reusable layouts in Angular
November 16, 2019
Edit 2020-11-23 : I still use this trick for my Angular projects and the more I use other technologies like Nuxt.js or Next.js, the more I think this pattern helps to design great front-end architectures.
When building JavaScript applications we usually split components in different layers, each one responsible of its concern. You’ve certainly heard about presentational components, container components, or the less well known layout components?
Layout components are used to hold common layout composition. This design enables reusing layouts across different parts of your application. It also simplify underlying components template and enforce the single responsibility principle.
The view layer architecture
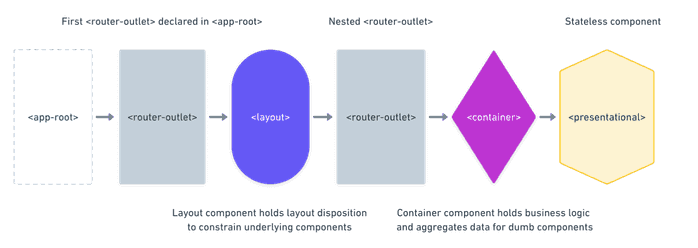
The schema below illustrates the component tree using a layout component. Layout components are realizable using the nested <router-outlet> technique.
Now let’s see what does it look like in code. Here is the root AppComponent that instantiates the first <router-outlet>.
import { Component } from '@angular/core';

@Component({
  selector: 'app-root',
  template: `<router-outlet></router-outlet>`,
})
export class AppComponent {}
Then we need to declare top level routes. Note that lazy loading is used to improve initial load performance.
import { Route } from '@angular/router';

export const APP_ROUTES: Route[] = [
  {
    path: '',
    redirectTo: '/dashboard',
    pathMatch: 'full',
  },
  {
    path: 'dashboard',
    loadChildren: () =>
      import('./dashboard/dashboard.module').then((m) => m.DashboardModule),
  },

  /* No layout routes */
  { path: 'login', component: LoginComponent },
  { path: 'register', component: RegisterComponent },

  /* Not found redirection */
  { path: '**', redirectTo: '' },
];
At this point we have to bring this together in the AppModule.
import { NgModule } from '@angular/core';
import { BrowserModule } from '@angular/platform-browser';
import { RouterModule } from '@angular/router';

import { APP_ROUTES } from './routes';
import { AppComponent } from './app.component.ts';

@NgModule({
  imports: [BrowserModule, RouterModule.forRoot(APP_ROUTES)],
  bootstrap: [AppComponent],
})
export class AppModule {}
The next step is to create the layout component. Consider this simple scenario.
import { Component } from '@angular/core';

@Component({
  selector: 'app-main-layout',
  template: `
    <app-navbar></app-navbar>
    <router-outlet></router-outlet>
    <app-footer></app-footer>
  `,
})
export class MainLayoutComponent {}
The nested <router-outlet> is declared in the MainLayoutComponent. The router will pass-through this layout component to resolve the child component.
import { Route } from '@angular/router';

import { DashboardComponent } from './dashboard.component';
import { MainLayoutComponent } from './main-layout.component';

export const DASHBOARD_ROUTES: Route[] = [
  {
    path: '',
    component: MainLayoutComponent,
    children: [
      {
        path: '',
        component: DashboardComponent,
      },
    ],
  },
];
The piece of code above stick all together, layout and container components are combined in a declarative way using the router tree. Imagine we want to swap the MainLayoutComponent with an other layout, we can easily achieve this without refactoring the DashboardComponent template, which is pretty cool.
Note that using this technique, the router re-creates layout components only when the user navigates between routes from different layouts.
Resources
Here is an interacting example created by Josip Bojčić using the nested router trick and multiple layouts.
There is an other approach using router events and router data. This approach doesn’t come with a nested <router-outlet> but at the end it looks less robust. We cannot create multiple layouts because it relies on conditional templating.

